What's Inside
Control your hosting costs and deploy your SAAS or website application fully on an AWS EC2 instance.
In this walkthrough, we will deploy a Qwik (although you can do this with any framework or package) website and use the NGINX and docker support included in this code package to set rate-limits and even route all traffic based on URL to any app you want. Although, here we will just keep things simple and route traffic directly to one app, but still use NGINX for that added support.
You do not have to use NGINX or docker, so can skip that step if needed.
Uses
Requirements
STEP 1
Setup Security Groups
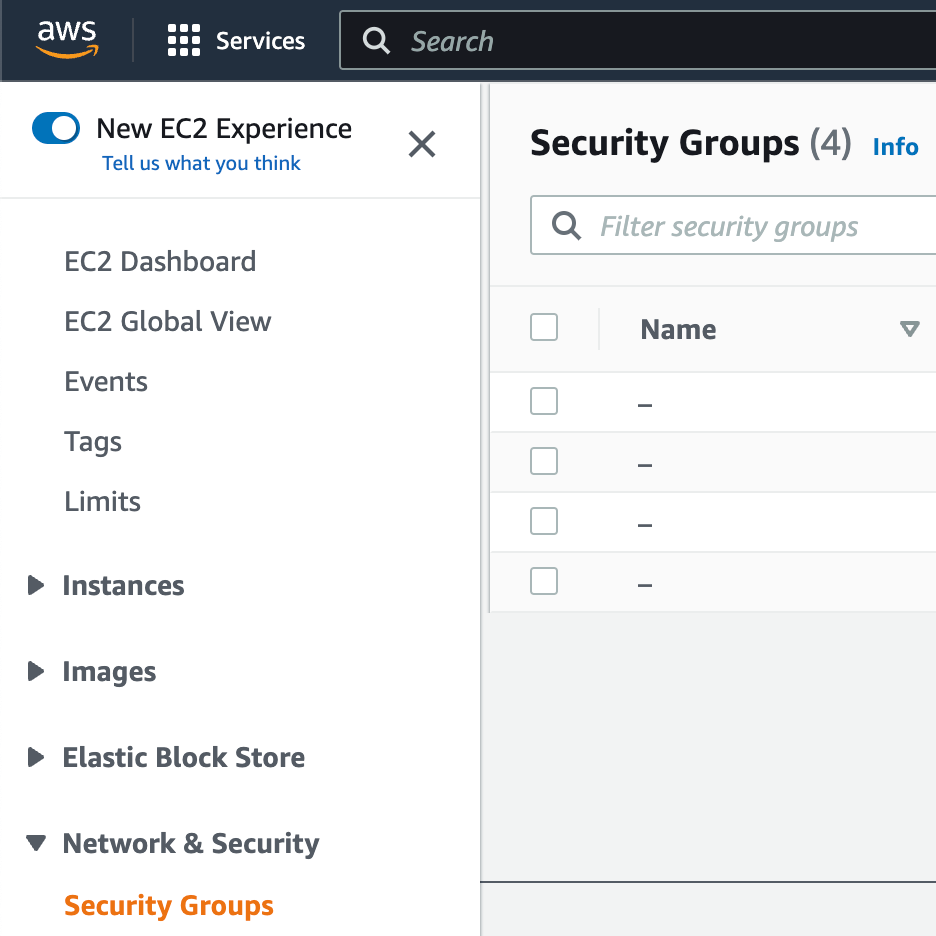
Ensure you have signed up to and logged into AWS. When at AWS, in the search bar, type EC2 and select that. You can then navigate on the left-hand pane to the security groups.
Select Create Security Group on the top right-hand corner of the screen. Now we need to create two security groups. One which allows you to access a machine terminal (the machine will be something you set up shortly) and the other will allow your machine to be fully accessed by the internet:
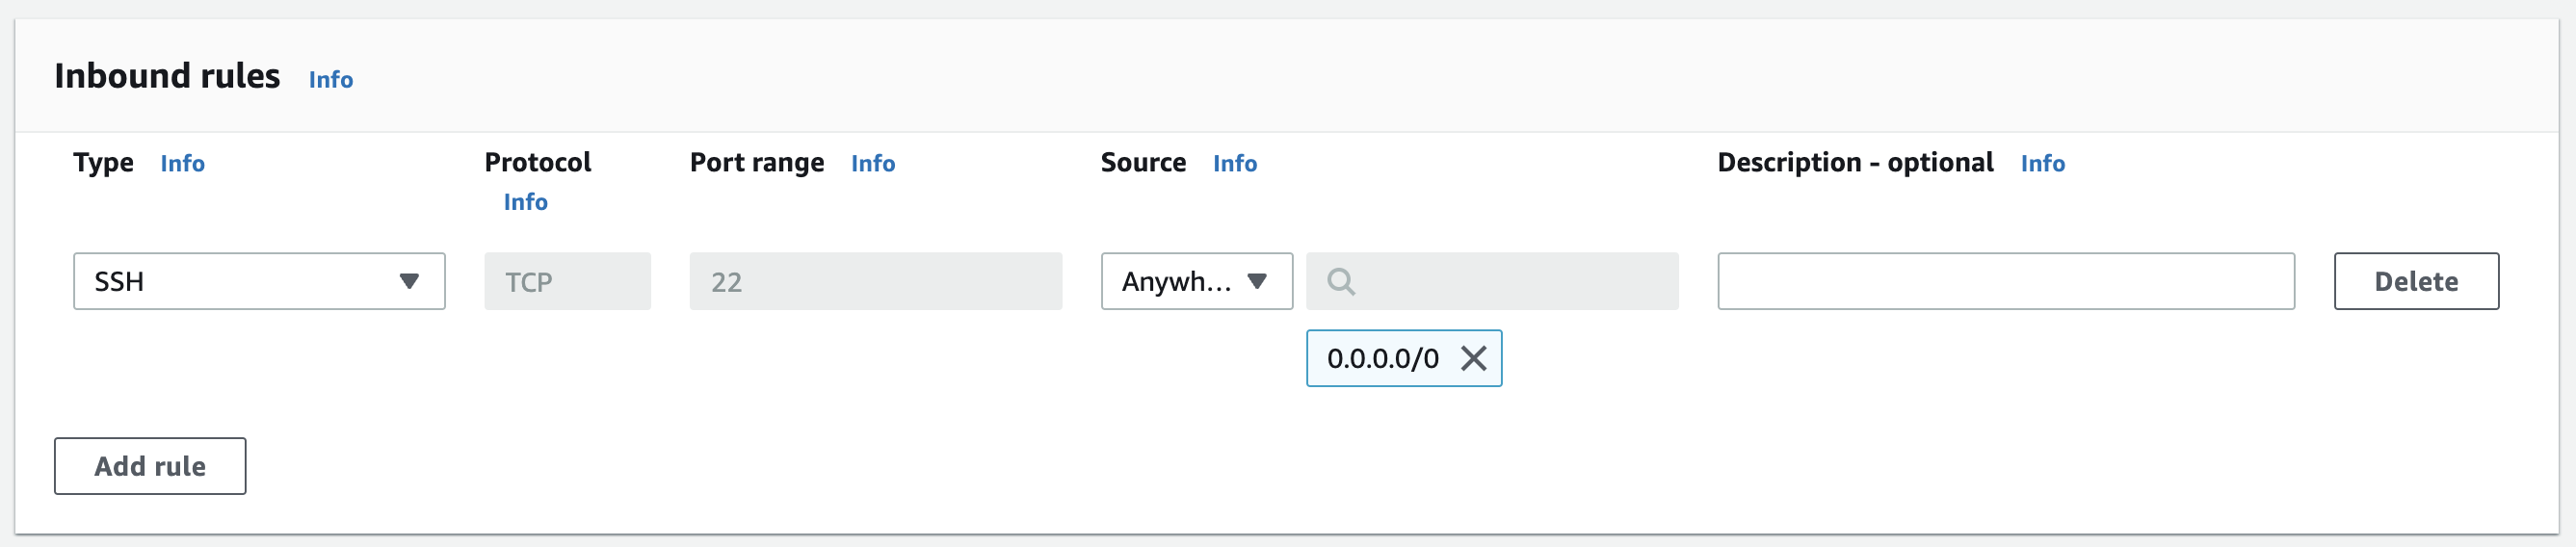
FIRST SECURITY GROUP - SSH ACCESS
Security group name: allow-ssh-sg (you can name it as you wish). Security group description: Allow full SSH access for developers.
SECOND SECURITY GROUP - PUBLIC INTERNET ACCESS
Security group name: allow-public-internet-access-sg (you can name it as you wish). Security group description: Allow inbound internet access.
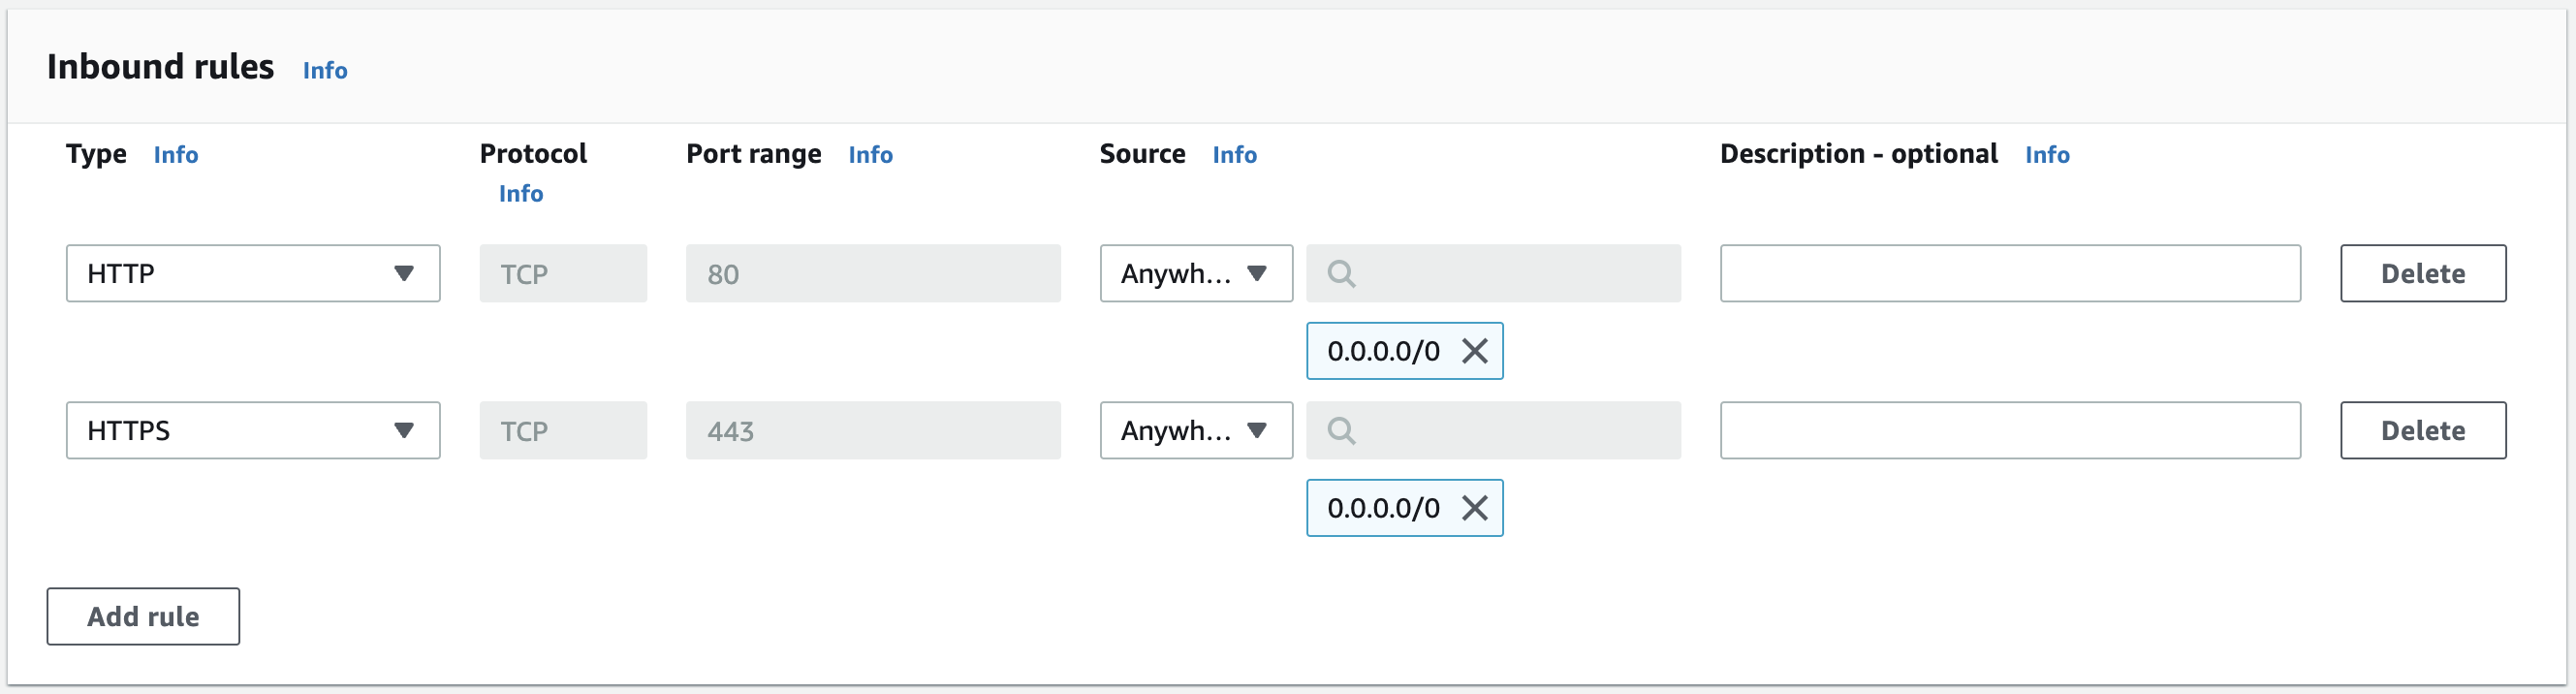
Take note of the port ranges selected by default. Users will essentially be able to either see a website hosted on port 80 or port 443. Later on we will use port 80 and integrate a load balance to take care of this. We will also use NGINX to use port 80 and forward any requests to port 3000 (which is the port our app will be hosted on). Although you can host your app on any port you like.
STEP 2
Setup EC2 Instance
Navigate back to your EC2 instance dashboard. Select Launch Instance.
Instance Name: My Website Instance (or name this whatever you like)
Instance Type: Ubuntu
Amazon Machine Image: Ubuntu 22.04 LTS (HVM), SSD Volume Type
Architecture: x86 (or use ARM if you develop on ARM, such as on an m1 mac and want to be consistent with your chip architecture)
Instance Type: t2.medium
Choose whatever instance type you think you might need. If your app is heavy going and requires a lot of memory, choose a different type. Recommendation is to start small and scale this up if you need to. It’s very easy to change again later on.
Keypair Pair (Login): Create a keypair or continue without one which is not recommended by AWS. We wont be using one here so not too important, but you might want to access your machine from your own local computer another time, in which case, you will need one.
Network Settings: Select an existing security group. Add both security groups you created earlier here.
The click Launch Instance.
Give your machine about 5 minutes to get itself set up.
STEP 3
Access Your EC2 Machine Instance
In the EC2 instances dashboard, select your instance and then Actions > Connect

Then in the next window, select Connect once again.
Great, you are now connected to your hosted EC2 machine.
Process with the installation process. Note, this step is only working because you allowed your machine to be accessed via SSH in the security group added to it earlier. If this step did not work for you, go back and ensure you have attached your SSH security group to your EC2 instance.
STEP 4
Prepare Your Machine Instance
sudo apt updateInstall Node.js, Yarn, NPM, and other dependencies. You can also install Python or other frameworks:
sudo apt install nodejs -y
sudo apt install npm -y
sudo npm install --global yarn
sudo npm i ts-node --g
If you are working a lot with node, I found the below to be helpful and ensure no issues with my node apps and that you have an up-to-date node version. I can’t tell you why, other than when I installed this stable version of node, issues that were cropping up disappeared in real-world battle testing.
sudo npm cache clean -f
sudo npm install -g n
sudo n stable
Install Docker (only if you are using Docker for NGINX or for your app):
sudo snap install docker
sudo docker version
STEP 5
Build Your Application
Clone your git repository and name it appropriately, such as frontend:
git clone https://github.com/your-git-account/your-git-repo.git frontendTip: If your git repo is private, you can add your git developer token before the github.com part of the git url:
git clone https://your-git-token@github.com/your-git-account/your-git-repo.git frontend
cd frontendAdd a .env file if your app uses environment variables. Then go into the file and paste in your environment variables:
$(~/ubuntu/frontend)
touch .env
sudo nano .env
Build your application. If you used yarn, then use yarn —exact, if you used npm, then run npm ci. In this case, I will run npm ci.
$(~/ubuntu/frontend)
npm ci$(~/ubuntu/frontend)
npm run startYou might not use the above command to test your application. You might use yarn or python or anything for that matter. The point is, that your application should start like it would on your local machine. If you see it does, then great.
We have not opened up port 3000 (which is what this particular application runs on, yours might be different). Therefore, if you start your application and then visit it from your public ip address displayed on the EC2 instance dashboard, it should just hang. But don’t worry, we will fix that with NGINX shortly.
Rinse and repeat this step for any backends or other web servers on other ports which you wish to add. You would then have a separate folder for each application which you can access from your root.
STEP 6
Add NGINX
Change to your project root directory and clone the NGINX setup repository:
cd ..
git clone http://the-nginx-repo-url.git reverseproxy
Change directory into the reverseproxy folder
cd reverseproxyThen modify the nginx.conf file
$(~/ubuntu/reverseproxy)
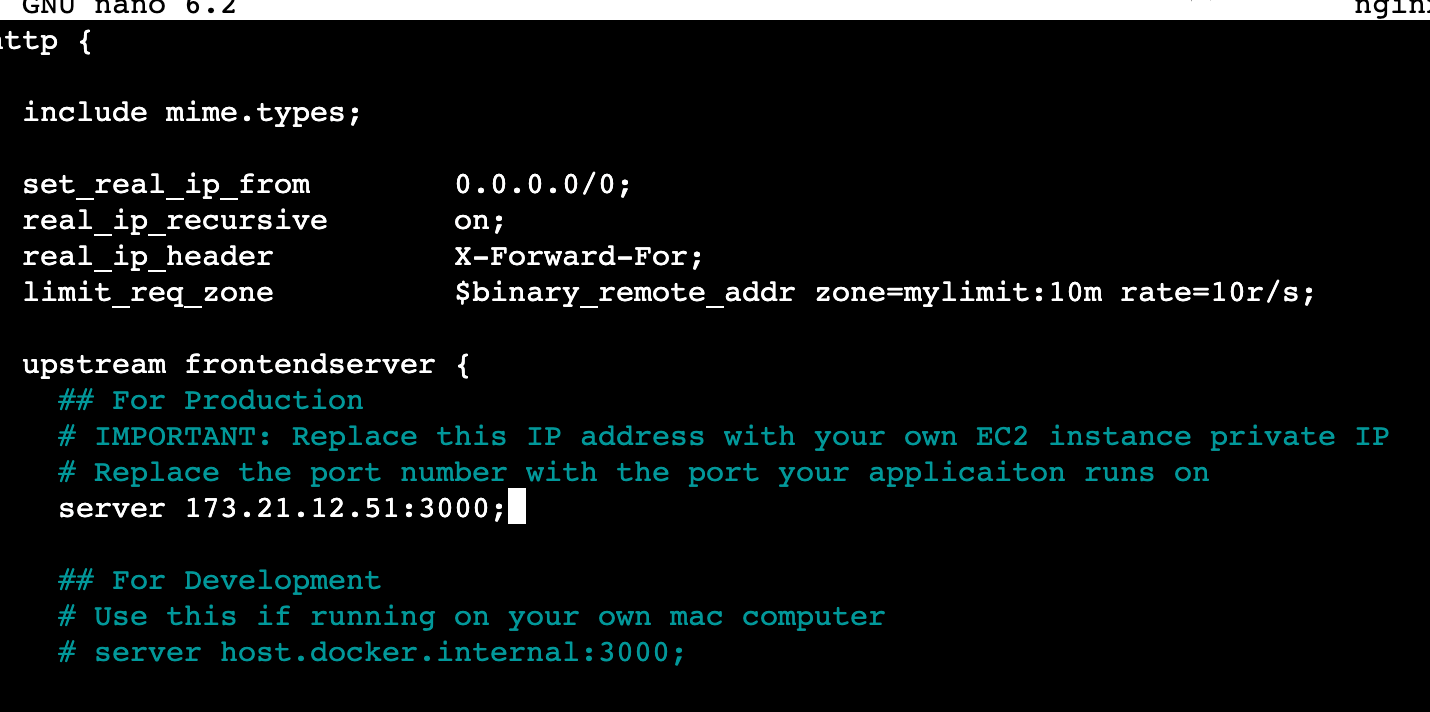
sudo nano nginx.confModify the ip address and port to match that of your EC2 machine and application respectively. For example, if your application runs on port 5173, then change 3000 to 5173 and the same with the ip address before the colon.
$(~/ubuntu/reverseproxy)
cd reverseproxy
sudo nano nginx.conf$(~/ubuntu/reverseproxy)
sudo docker build -t reverseproxy . --no-cacheSTEP 7
Run NGINX Permanently
Now, let us create a service which runs all the time, at system boot, at restart and if the process fails, make it restart again.
sudo nano /etc/systemd/system/reverseproxy.serviceAdd the following service configuration:
[Unit]
Description=Reverseproxy Service
After=network.target
Wants=network.target


[Service]
Type=simple
Restart=always
RestartSec=5
ExecStart=sudo docker run -p 80:80 reverseproxy

[Install]
WantedBy=default.target
Run the following commands
sudo systemctl enable reverseproxy
sudo systemctl start reverseproxy
sudo systemctl status reverseproxy
When running status, your should see a green active sign. If you see this. Everything is working. Other useful commands:
sudo systemctl daemon-reload
sudo systemctl stop reverseproxy
sudo journalctl -fu reverseproxy.service
STEP 8
Run frontend permanently
** SPECIAL NOTE **
It is advised to run your application from within docker like we did with NGINX above. The below is just to show you how to do this without using docker. However, when using Qwik for example as a framework, it was noted that there were issues getting this to work without using docker in a production environment.
Create a frontend service
sudo nano /etc/systemd/system/frontend.serviceThen paste in the below and save the file:
[Unit]

Description=Frontend Service
After=network.target
Wants=network.target

[Service]
Type=simple
Restart=always
RestartSec=5
ExecStart=npm --prefix /home/ubuntu/frontend start

[Install]
WantedBy=default.target
Note: For ExecStart above, if you were using yarn, you could use something like:
ExecStart=yarn —cwd /home/ubuntu/cwizards/frontend start
If using Python or some other application, you just need to figure out what the correct line is for ExecStart to initiate it.
Run the following commands
sudo systemctl enable frontend
sudo systemctl start frontend
sudo systemctl status frontend
Same check again, when using status, this should show as active.
sudo systemctl daemon-reload
sudo systemctl stop frontend
sudo journalctl -fu frontend.service
STEP 9
Test your application on http only
Now it is time to make sure everything is working. Test your application by going to your public IP address, which is shown on your EC2 instance, but…make sure you replace https:// with http:// - otherwise, it will not work.
If you do not see your website, try stopping the services above and running them manually from the CLI in two different web pages. This will help to troubleshoot on where your application is failing.
Connect Your Load Balancer
Well done - you made it
Great, your website works. But now you probably want to make it https and verify with your SSL etc. Luckily AWS makes this really straight forward. Follow how to set this up in the walkthrough video here: https://youtu.be/3j33lNzMZlM